I’ll be honest, Hugo is not the simplest tool in the world. I have spent hours digging through forum posts and documentation pages.
But it was simple enough for me to use when I first started out making websites, when I didn’t know what a config file did, or what a server was. So there’s that.
Note: I’ve created a really minimal Hugo starter site example, the most barebones example of how I structure my sites.
What makes it worth learning + using? For me the answer is three-fold:
It doesn’t break: Once have the binary downloaded, you’ll never have to install anything else again, it’s all self-contained. It’s also “finished software”, you can stick to your current version and never upgrade.
When I make sites for clients, I don’t want them to deal with fix broken stuff months down the line, the fewer moving parts the better. Having just one part? Bliss.
Ease-of-use: Once you’ve done the hard work of creating the site, it’s really simple for other people to use. They clone the repo, install Hugo, run ‘hugo serve’ and…that’s it. No annoying ’npm install’ commands, or running a database process. “i’m so scared of package managers and build systems”
It’s light: I say this often, but it’s so nice to work with something that’s just a simple binary. No plugin downloads or package upgrades, no need for a runtime environment, no slow build times, and the Hugo server’s hot reloading is fast.
I’m not going to try to teach you how to use Hugo in this post, I’ll only recommend this tutorial, Googling stuff when you’re stuck, and this guide. Heck, if you run into a problem, feel free to DM me and I’ll help you if I can.
Instead, this post is about documenting what is best described as the “folk practices” around how I work with Hugo.
The command line
The only command I run is “hugo server”. It’s what starts up the site preview that I can use for both writing and development. One of my favourite things about Hugo is that, unlike most other generators, this command doesn’t create an output directory each time (which clutters up my file searches), it just serves pages from memory.
To create a new post I just make a new .md file myself in my text editor and save it to the relevant folder.
Even creating a new site is a process of simply copying over one of my previous sites, and editing the template files in there.
Site structure
I don’t use themes, none of my sites even have a “themes” directory. I don’t want to work with or depend on someone else’s code.
I store my templates and static files directly in the root, so my site structure looks like this.
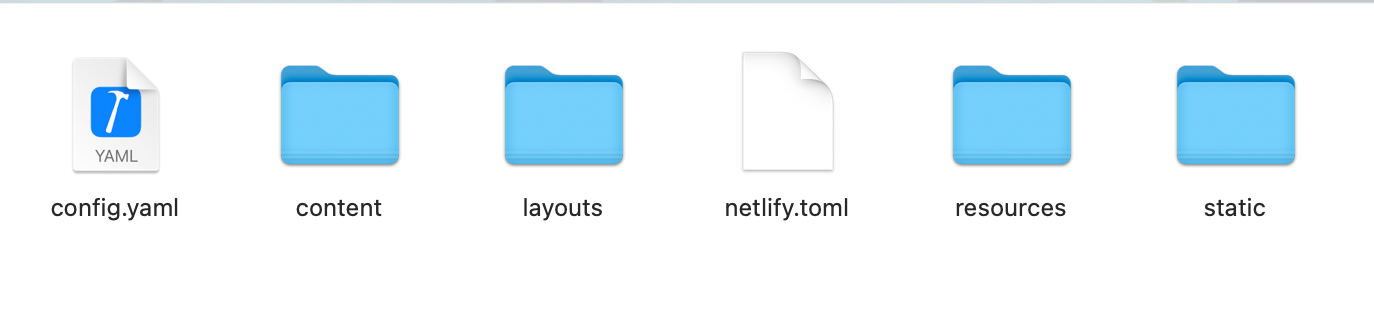
This is all you need. Really. Even the “resources” folder is empty, it’s just generated by Hugo.
Content
Try to only use the bare minimum frontmatter fields. For me these are title, description, and date. I prefer YAML over TOML.
Write all your posts in Markdown, dropping down to HTML when necessary. Hugo let’s you use them within the same file if you have unsafe set to true in your config file. Don’t use shortcodes, these are generator-specific constructs that reduce portability.
Processing
Hugo does provide a bunch of processing funtionality, but I don’t use any of it. Stylesheets are plain CSS, images are optimised before I add them, not during the build step.
Deployment
All my static sites are deployed on Netlify, they have a very generous free tier for static sites. It rebuilds the site whenever I push to the Github repo, and handles builds according to a netlify.config file. This is what mine looks like:
baseURL = "/"

[[headers]]
  for = "/*"
    [headers.values]
      Access-Control-Allow-Origin = "*"

[build]
  command = "hugo"
  publish = "public"

[build.environment]
  HUGO_VERSION = "0.105.0"

[[redirects]]
  from = "/*"
  to = "/404.html"
  status = 404

[[headers]]
  for = "/*"
    [headers.values]
    Cache-Control = "public, immutable, max-age=900"

[[headers]]
  for = "/fonts/*"
    [headers.values]
    Cache-Control = "public, immutable, max-age=31536000"

[[headers]]
  for = "/css/*"
    [headers.values]
    Cache-Control = "public, must-revalidate, max-age=300000"
    ETag = "unique_value"

[[headers]]
  for = "/media/*"
    [headers.values]
    Cache-Control = "public, immutable, max-age=31536000"
Power tools
Render hooks
Hugo lets you hook into the generation process for certain Markdown elements, so that you can customise the output HTML. At the moment, there are hooks available for headings, links, images, and code blocks.
Here’s an example of using the link render hook (/layouts/_default/_markup/render-link.html) to set only external links to open in a new tab.
<a href="{{ .Destination | safeURL }}"{{ with .Title}} title="{{ . }}"{{ end }}{{ if strings.HasPrefix .Destination "http" }} target="_blank" class="external-link" {{ end }}>{{ .Text | safeHTML }}</a>
Forum
I’ve found most answers to my questions from Googling “how to do X in hugo” and following one of the links to a similar question Hugo forum. Many answers come directly from the creator and chief maintainers.
Template functions
There are a ton of useful functions and methods in Hugo’s templating language. It isn’t a pretty one, nor is it particularly beginner-friendly (it uses Polish notation) but it can do way more than any other templating language I’ve used.
Simple example of fetching pages from the “guides” section of my site.
{{ range where .Site.RegularPages "Section" "guides" }}
    <p>
        <a href="{{ .Permalink }}"> {{ .Title }} </a>
    </p>
{{ end }}
In-built functionality
There’s a syntax highlighter, a bunch of processing functions, the ability to add classes to Markdown elements with Markdown attributes, templates for RSS feeds, and help for multi-lingual sites.